

Last Updated: November 20, 2026
A retail floor plan affects more than where products go. It determines how customers find what they need, how employees replenish stock, where checkout and storage fit, and which building systems may need to change. If you are opening or renovating a store in Greater Boston, the important question is not simply which layout looks best. It is which layout supports your business and can be delivered within the property’s constraints, your budget, and the applicable requirements.
This guide will help you compare common retail layouts, understand what must be checked before ordering fixtures, and identify decisions to make with your landlord and project team.
Define the Retail Experience and Space Requirements
Start with how customers will shop and how the business will operate. A clothing boutique with fitting rooms, a specialty retailer offering consultations, and a store selling high-volume everyday products may need very different circulation and storage arrangements even when their floor areas are similar.
As the business owner or operator, establish:
- Customer activities: Will people browse, collect a specific item, try products, wait for service, or collect online orders? Where might lines form?
- Merchandise and fixtures: Which products need display space, security, refrigeration, power, or special lighting? Which fixtures must be fixed, and which could move?
- Staff and stock: How will deliveries reach storage? Where will employees prepare orders, restock shelves, and work away from the sales floor?
- Operating priorities: What matters more for this store: product capacity, room to browse, staff visibility, private consultations, or the flexibility to change displays?
Separate sales area from space needed for storage, checkout, staff functions, and other uses. Do not assume the square footage advertised in a listing is all available for merchandise. The design team should verify dimensions and identify which areas the proposed use can actually occupy.
Check the Lease and Existing Building Before Finalizing the Layout
If you lease the property, review the work letter or construction exhibit and related lease terms before committing to fixtures or extensive design. These documents may allocate responsibility for the condition of the space, improvements, approvals, utilities, and landlord work. Ask what you may alter, which drawings require landlord approval, and whether upgrades to landlord-controlled electrical, HVAC, or other systems would be the landlord’s or tenant’s responsibility. A layout can be technically workable yet exceed your project budget if those upgrades are assigned to you. Confirm how approval periods and opening obligations affect your schedule. If necessary, have a qualified adviser review the lease provisions with you.
A promising layout can become more expensive when the property cannot support it without additional work. Your project team may need to check electrical capacity, heating and cooling, plumbing, ventilation, fire protection, storefront access, and existing walls. Columns and structural elements constrain the plan; proposed changes to them require professional evaluation and, where applicable, landlord approval.
A practical example: A proposed checkout or display wall may need new outlets and lighting. Whether existing circuits can serve them is a technical finding. Before treating a layout as feasible, ask what can remain, what must change, and what is still unknown.
Also establish whether the planned operation matches the property’s legally approved use. In Boston, a Certificate of Occupancy is required when a property has no existing certificate, when its use or occupancy changes, or when major renovations change egress or life-safety systems. The project team should confirm the applicable municipal approval path for the actual property and scope. Other Greater Boston municipalities administer their own reviews.
For more on how these questions affect renovation scope, see our guide to commercial retail space renovation planning.
Choose a Layout That Fits How Customers Shop
Four retail layout types provide useful starting points:
| Layout | How it organizes the store | Useful when | Trade-off to examine |
| Grid | Parallel shelving aisles | Customers need to locate many stocked items efficiently | Display capacity versus sightlines and comfortable circulation |
| Loop | A principal route guides shoppers around merchandise | Exploring multiple product groups is part of the visit | Whether the route fits the footprint and provides direct access where needed |
| Free-flow | Displays form flexible, less regular paths | Products benefit from browsing or changing arrangements | Keeping routes legible and accessible as fixtures move |
| Spine | A main route serves smaller merchandise areas | The space is long, narrow, or organized into distinct zones | Whether side areas remain easy to find and reach |
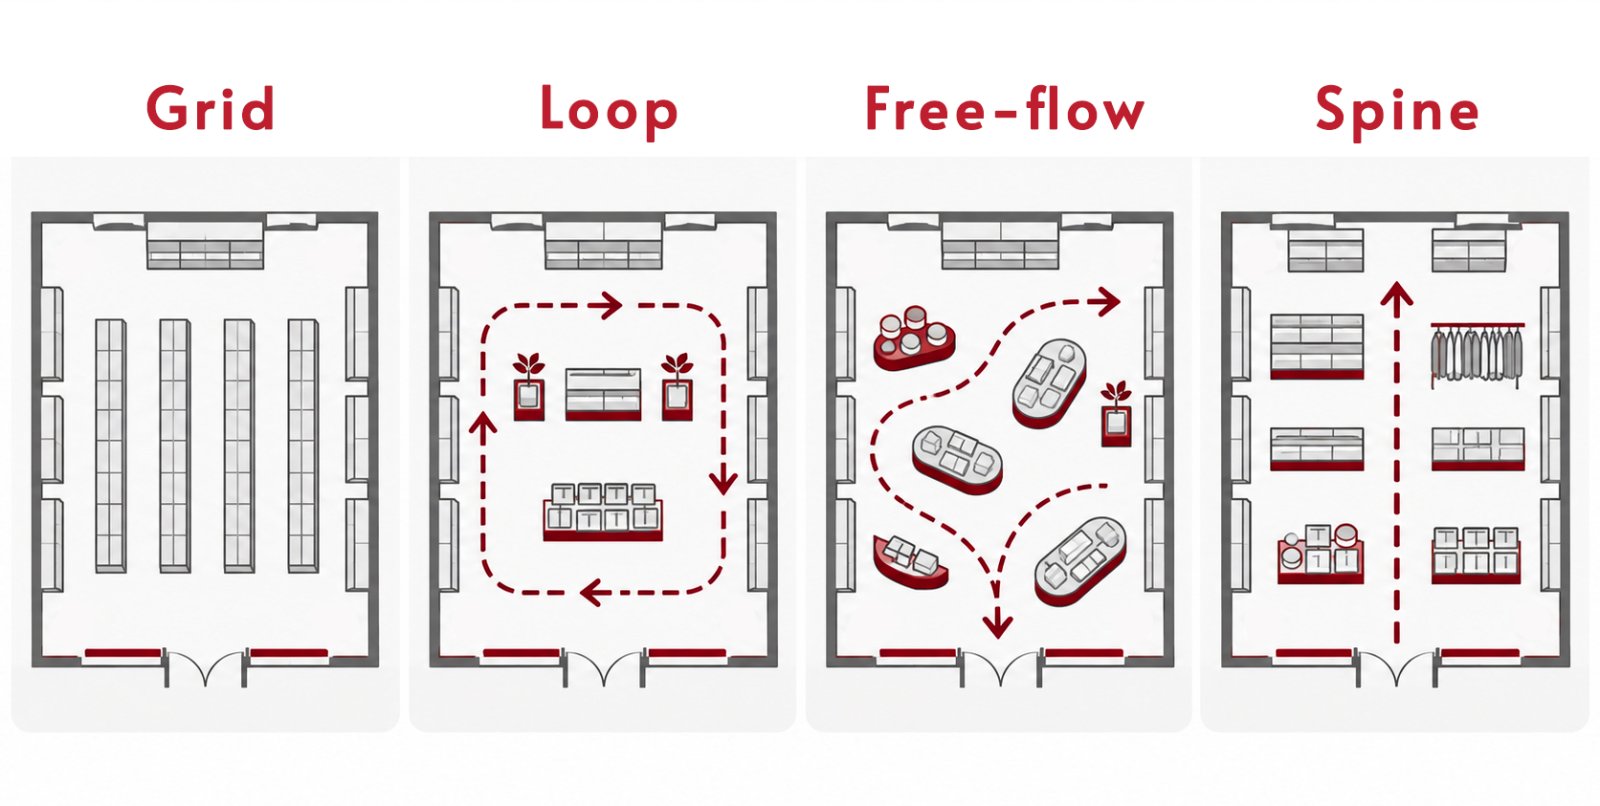
To compare layouts, use the measured plan and test each option against a busy checkout period and a restocking period. Trace where a queue would form, how goods move from deliveries to storage and shelves, and whether staff can replenish products without blocking shoppers. Ask the design team to confirm that these routes remain compatible with required accessibility and exit paths. The useful comparison is not simply how many fixtures fit, but whether customers and staff can use the space at the same time.
Circulation routes, decompression zones, and focal points can help you make those decisions. The first area inside an entrance is often called a decompression zone: customers may pause to orient themselves there, so a crowded display could interfere with entry. A focal point—such as a feature display or a visible product category—can provide direction further into the store. Their effectiveness depends on the customers and operating model; neither is a universal formula for sales growth.
Merchandise zoning should likewise respond to how customers shop, not just how products arrive from suppliers. Where possible, test fixture dimensions and sightlines on a realistic plan. A planogram describes merchandise and display placement; it is not a substitute for the construction drawings needed to coordinate electrical, lighting, walls, and other building work.
Coordinate Accessibility, Exits, and Building Systems With the Layout
Accessible circulation and life safety are design inputs, not final checks after shelving arrives. Retail establishments in Massachusetts are subject to applicable federal ADA accessibility requirements and state 521 CMR accessibility regulations. The scope of an alteration and the existing building can affect what is required. Qualified design professionals must establish the applicable provisions and incorporate them into the plan.
Consider the implications of fixture placement for:
- Accessible routes: The required route must connect accessible spaces and elements without being obstructed by temporary displays or checkout lines. Clearances and maneuvering needs depend on the configuration.
- Counters and fitting rooms: Where applicable, accessible sales or service counters and fitting rooms need to be incorporated into the design rather than improvised after millwork is ordered.
- Merchandise shelves: Under the federal ADA Standards, self-service shelving must be on an accessible route, but the shelves themselves are generally exempt from the usual reach-range rule. Other retail features may have different requirements.
- Entrances and changes in level: Existing thresholds, door approaches, and floor elevations can affect the usable area and the work needed to provide access.
The U.S. Access Board’s ADA scoping requirements for retail sales and service elements explain why counters, checkout aisles, and self-service shelving are not governed by one identical rule. Turning areas may be required in particular configurations, but providing turning space at every dead-end merchandise aisle is not a universal federal requirement.
The project team must also review occupancy, exit access, doors, fire protection, and the effect of walls and fixtures on required egress routes. These requirements depend on the use and existing building; they should not be reduced to blanket rules about stockrooms or the number of exits. In Massachusetts, the governing building-code framework includes the 10th edition of 780 CMR, with local review and other applicable codes.
For you, the key question is whether a proposed merchandising layout remains workable after the professional team accounts for accessibility, safe exit routes, and building systems.
Translate the Layout Into a Buildable Scope, Budget, and Schedule
Sketching software can help you compare fixture arrangements, and store traffic or operational data may help you refine the layout after opening. But a digital floor plan does not validate dimensions, equipment capacity, code compliance, or construction costs. Those require measurements, technical evaluation, and coordinated design.
Before relying on a construction price, ask the team to establish which parts of the layout require:
- New walls, openings, counters, or fixed millwork.
- Lighting, electrical circuits, data connections, plumbing, or HVAC changes.
- Modifications affecting accessibility, egress, fire alarms, or sprinklers.
- Protection of occupied areas, deliveries, inspections, and coordination with the landlord.
A commercial tenant improvement may start with a shell space that needs more than display fixtures. Beantown Builders’ Roxbury Commercial Tenant Improvement transformed a shell into a functional commercial interior through framing, finishes, and mechanical, electrical, and plumbing coordination.
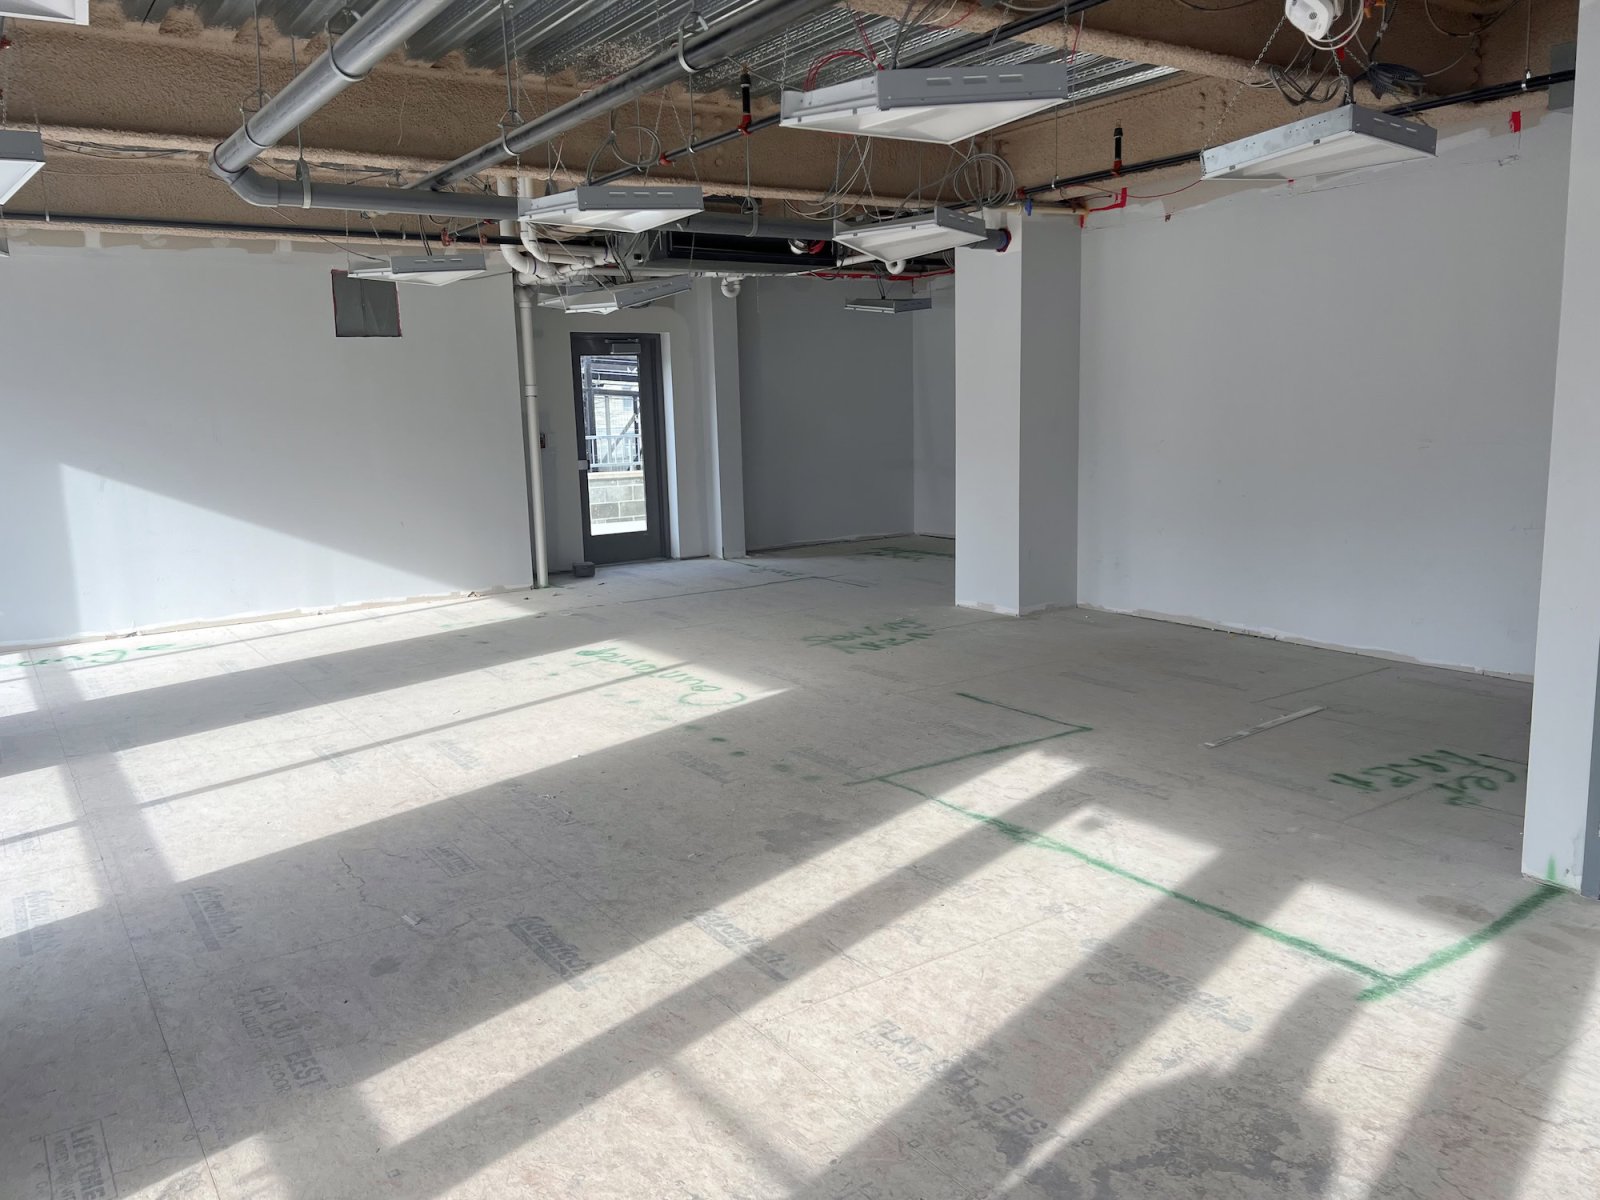
If you’re comparing properties, ask what usable systems the landlord will deliver and what your fit-out must add. The cost of preparing an unfinished interior can be materially different from rearranging fixtures in an already operational store.
Compare budgets using the same scope. Identify what is included and excluded, which fixtures or equipment you will supply, which selections are allowances, and which existing conditions still need investigation. If the layout changes, ask which construction documents, costs, and schedule dependencies must be reconsidered.
Phased work may be possible, but there is no universal sequence. Building-system work, inspections, safe access, and any plan to keep operating determine what can be separated. Discuss potential opening dates only after the team has accounted for design development, landlord and municipal reviews, material lead times, construction, and required approvals.
Review the Plan Before Committing to the Fit-Out
A layout is ready to move toward construction planning when you can answer a few connected questions: Does the plan support how the business will operate? Has the project team checked the property’s limitations and applicable requirements? Are the lease and landlord responsibilities understood? Are fixtures and building systems being coordinated from the same information? Do the budget and schedule reflect the work actually proposed, including unresolved conditions?
If an answer is missing, identify who will resolve it and what information is needed. That is more useful than ordering fixtures or approving a construction date based on a floor plan that still depends on assumptions.
Planning a Retail Fit-Out With Beantown Builders
A successful retail layout must connect the business’s intended customer experience with a buildable plan. Beantown Builders’ integrated design-build services include select retail build-outs and other commercial renovations, with design and construction planning coordinated around the property and proposed scope.
If you are considering a retail renovation or build-out in Greater Boston, Book a Free Discovery Call to discuss your business goals, high-level scope, timing, and budget range. A site visit, technical feasibility assessment, detailed design, and project-specific pricing are separate steps when appropriate.
Frequently Asked Questions
How do you plan a retail store layout?
Start with the merchandise, customer activities, staffing, storage, and checkout requirements. Compare layout concepts within the actual usable space, then have qualified professionals check property constraints, accessibility, egress, and building systems before the design and budget are finalized.
What is a decompression zone in retail space planning?
It is the area just inside the entrance where customers may slow down and orient themselves. Keeping that area easy to navigate can improve arrival and circulation, but its size and merchandising treatment should suit the store rather than follow a universal sales rule.
What should a retailer consider about ADA compliance when planning a store?
Consider accessible entrances and routes, sales and service counters, and fitting rooms where provided. Federal ADA standards and Massachusetts 521 CMR both matter; the requirements for an existing space depend on the proposed work. Your design team should determine the applicable rules before fixtures or counters are ordered.
Can a retail layout improve sales without expanding the store?
A revised layout may make products easier to find, improve circulation, or free space currently used inefficiently. Whether it improves revenue depends on many factors beyond the floor plan, so evaluate potential changes against your store’s actual operations and performance rather than expecting a guaranteed sales increase.